

A quality management system that meets the requirements of ISO 13485 is the key to getting a medical device approved for the market. But how do you reach that point — and where do you even begin?
The roadmap below lays out the path. Step by step, it shows how to turn scattered processes and improvised routines into a coherent, smoothly running quality management system that actually works in daily practice.
Regulators don’t judge your intentions — they judge your product. Market approval depends on what you’ve actually built, not on what you once planned to build. That’s why every quality management system should begin with a reality check. Look closely at the device as it exists today, not as it appeared in early concept slides or grant proposals.
Start by defining the intended use of the product, who the user or patient is, and what risk class applies. These three points form the foundation of all regulatory and quality work. And be honest here: your device may have evolved since the first prototype, and that evolution can shift its risk profile or even its regulatory category. A realistic, up-to-date definition prevents expensive detours later when authorities examine the final product.
Next, map out your target markets. Each region has its own view of what “good” looks like. In the European Union, the Medical Device Regulation (MDR) and In Vitro Diagnostic Regulation (IVDR) define the baseline. In the United States, the Food and Drug Administration (FDA) operates under 21 CFR 820, soon to be replaced by the Quality Management System Regulation that formally aligns with ISO 13485. Other regions, from Australia to Canada, follow their own variations, but all expect a functioning, risk-based quality system. Understanding these differences early helps design a QMS that can stand up to scrutiny anywhere you plan to sell.
To keep things manageable, choose one pilot product or feature to lead the way through your QMS. This becomes your test case, the project through which you’ll define, document and refine each process. Using a single pilot gives structure to the work and exposes gaps quickly, long before the full product portfolio enters the system.
Once the baseline for your product is clear, turn your attention to the processes behind it. Before building anything new, you need to understand how work already happens. These existing habits will form the raw material for your quality management system later on.
Start with a team workshop that lasts about an hour and a half. Bring together people from design, engineering, operations, purchasing, and customer support, anyone who touches the product in some way. The goal is not to lecture about regulations but to listen and observe. Map out, step by step, how the team currently handles:
Capture everything as it really is, not as you wish it were. The point here is to create a realistic picture of your current system. You’ll soon need to align these processes with ISO 13485, but first you must see them clearly.
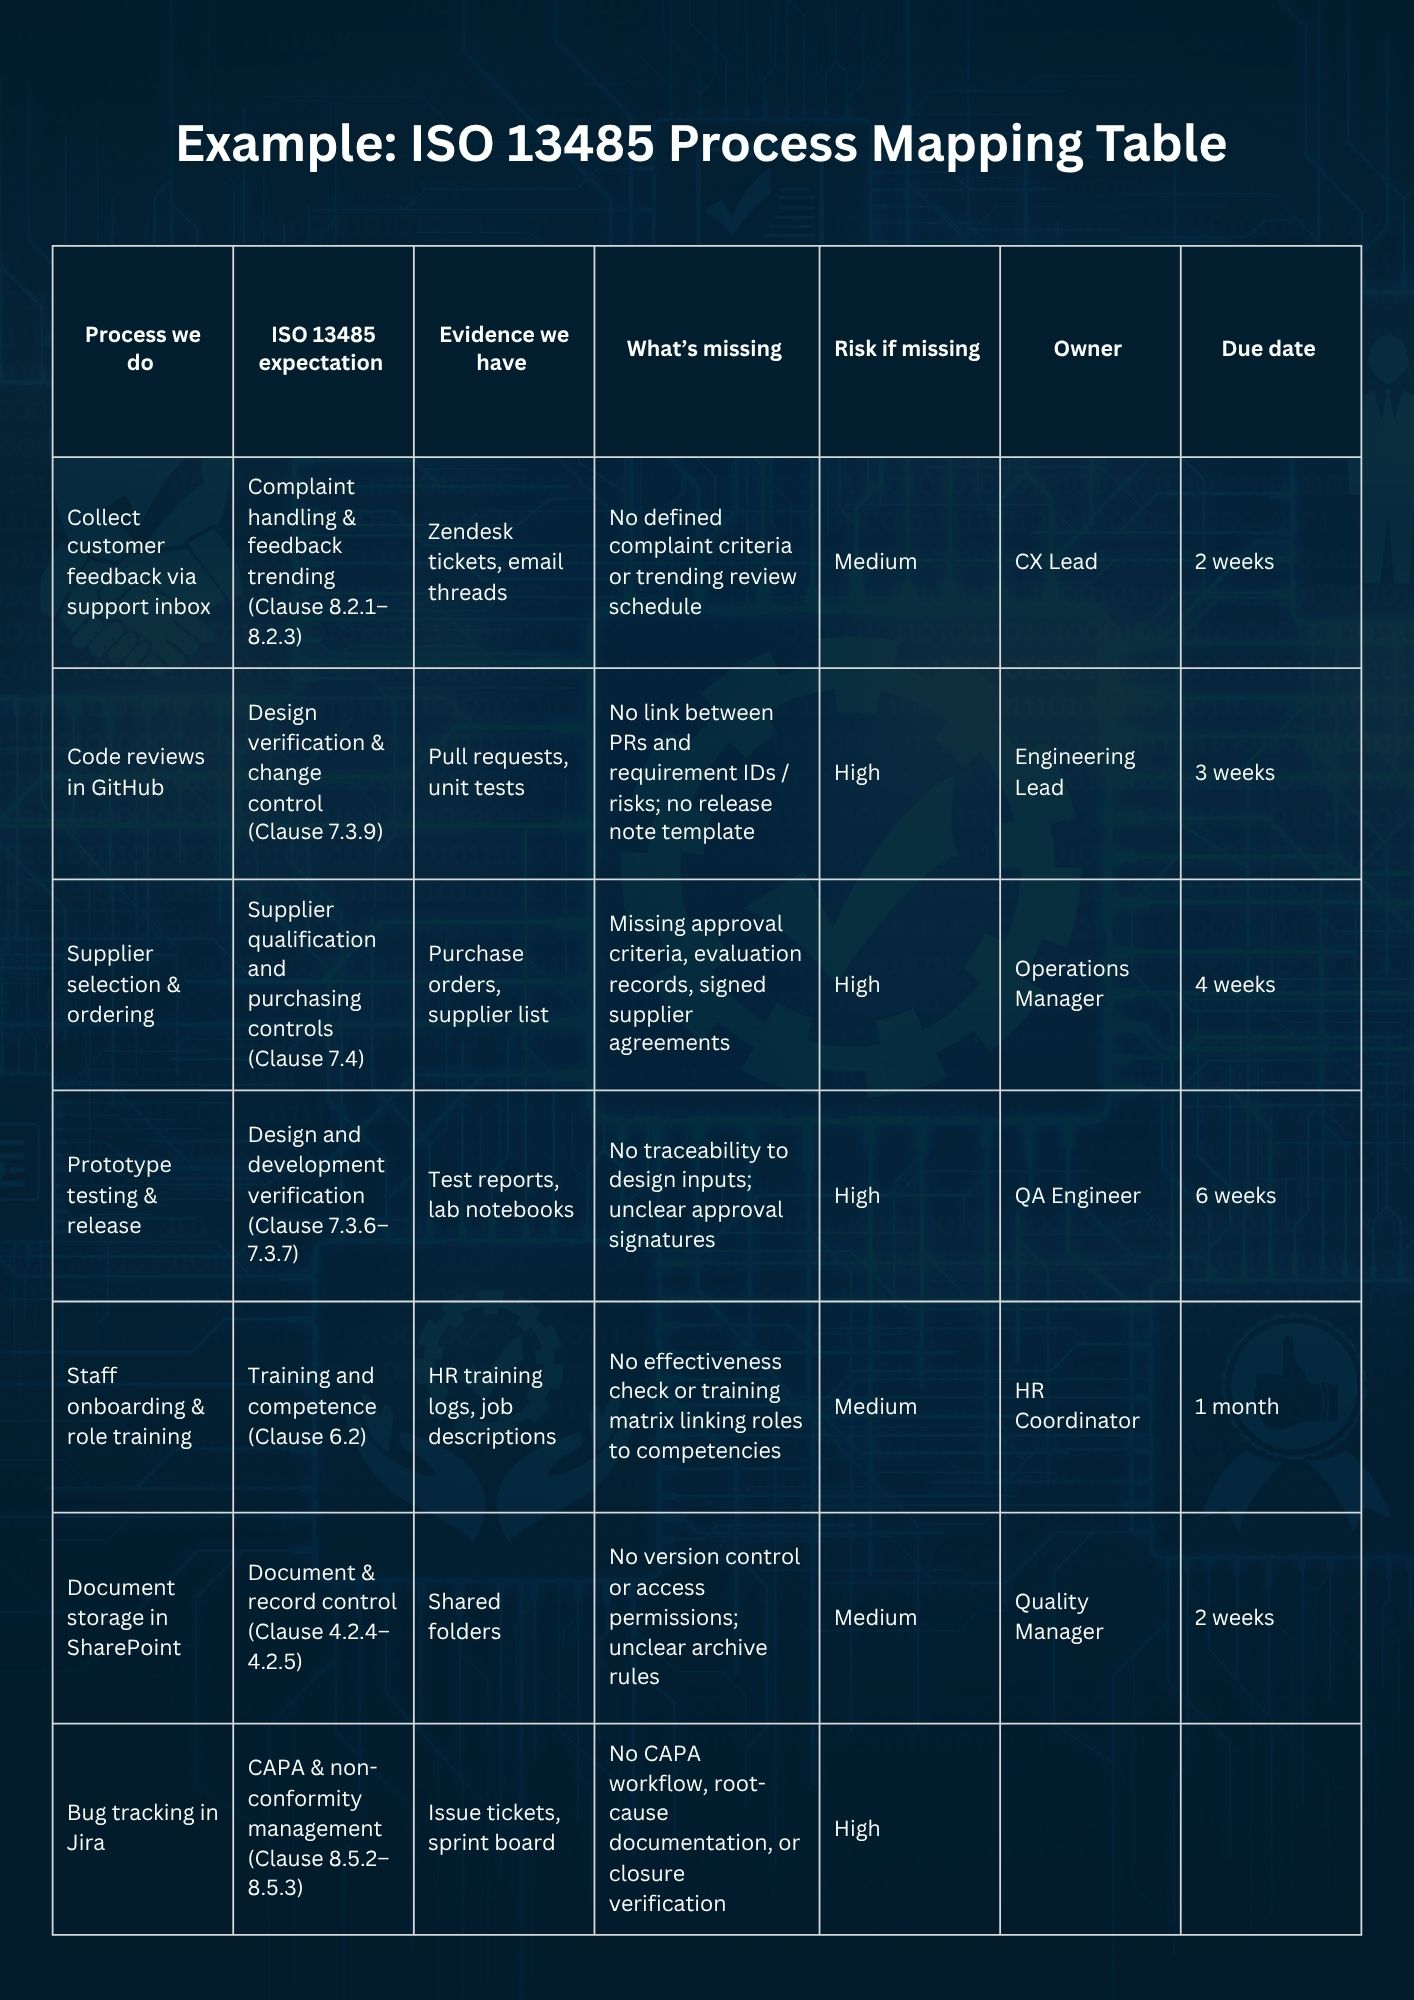
With your current processes mapped out, it’s time to bring order to the chaos. The easiest way is to build a one-page overview, your mapping table. Think of it as your navigation chart through ISO 13485.
Each row represents a process you already perform, such as managing design changes or handling customer feedback. Across the columns, note what the ISO 13485 expectation is, what evidence you already have, what’s still missing, how risky that gap is (high, medium, or low), and who will close it by when.
Keep this table process-oriented, not clause-oriented. Regulators think in terms of how you design, test, and release products, not in terms of paragraph numbers. Within a few hours, you’ll have a clear overview of where you stand and which areas need attention first.
Once your mapping table is complete, resist the urge to fix everything at once. ISO 13485 is risk-based, your approach should be too. Rank each gap by risk and effort, and focus first on what’s both high-risk and low-effort.
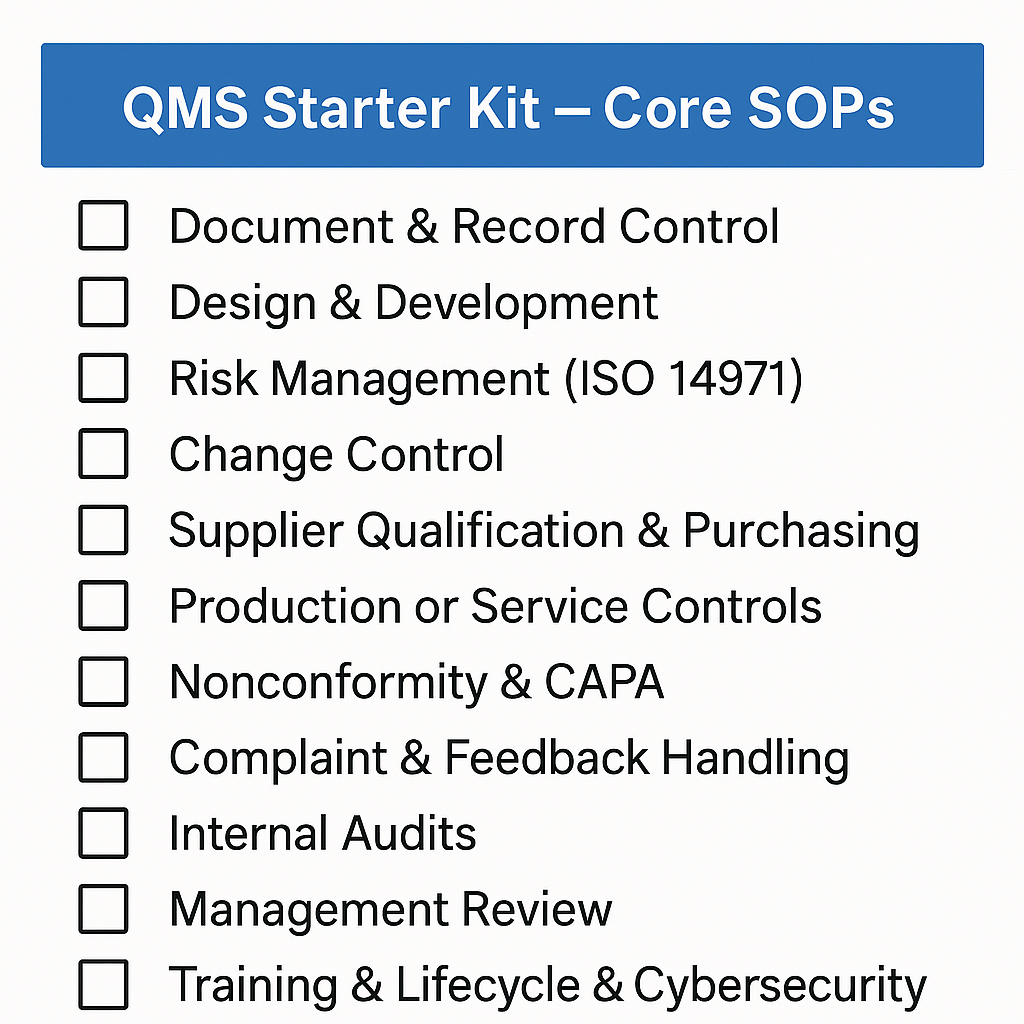
Certain elements are non-negotiable before any product ships: document and record control, design and development controls, risk management under ISO 14971, supplier and purchasing controls, production or servicing controls, CAPA, complaints and feedback, internal audits, and management review. Tackle these first, and you’ll have the backbone of a functioning QMS.
One of the biggest mistakes companies make is forcing teams to use tools that don’t fit how they work. A QMS built on the wrong software quickly turns into a system no one follows, and that defeats its entire purpose.
Begin with familiar tools and involve your team in choosing which ones to adopt for your QMS. Store documents and records in SharePoint or Google Drive, but set clear permissions and version control from the start. Manage design controls in Git with pull requests and a simple spreadsheet for requirements. Track issues and CAPA in Jira, or keep a straightforward CAPA log if that’s easier. Record training in a spreadsheet showing each role, required competence, and supporting evidence.
Any software that touches QMS activities should be validated in a risk-based way, a short rationale and basic test evidence will usually do. The goal is a system that supports your work, not one that slows it down.
Once your processes are defined, put them in writing. Clear, accessible procedures make it easier for everyone to follow the same path, and help new staff understand how things work from day one.
Keep this starter kit short and practical: around 8–12 pages in total, with each SOP no longer than two or three pages. Use flowcharts where possible so people can see the sequence at a glance.
Your core SOPs should cover:
This step isn’t just for your team, it’s for the auditor as well. A clear, well-organised evidence set makes their job easier, keeps the review on track, and leaves a good impression. Think of it as showing not only what you do, but how well you stay in control.
Prepare the essentials:
Auditors value clarity and structure. Give them that, and you make compliance, and your own audit days, much smoother.
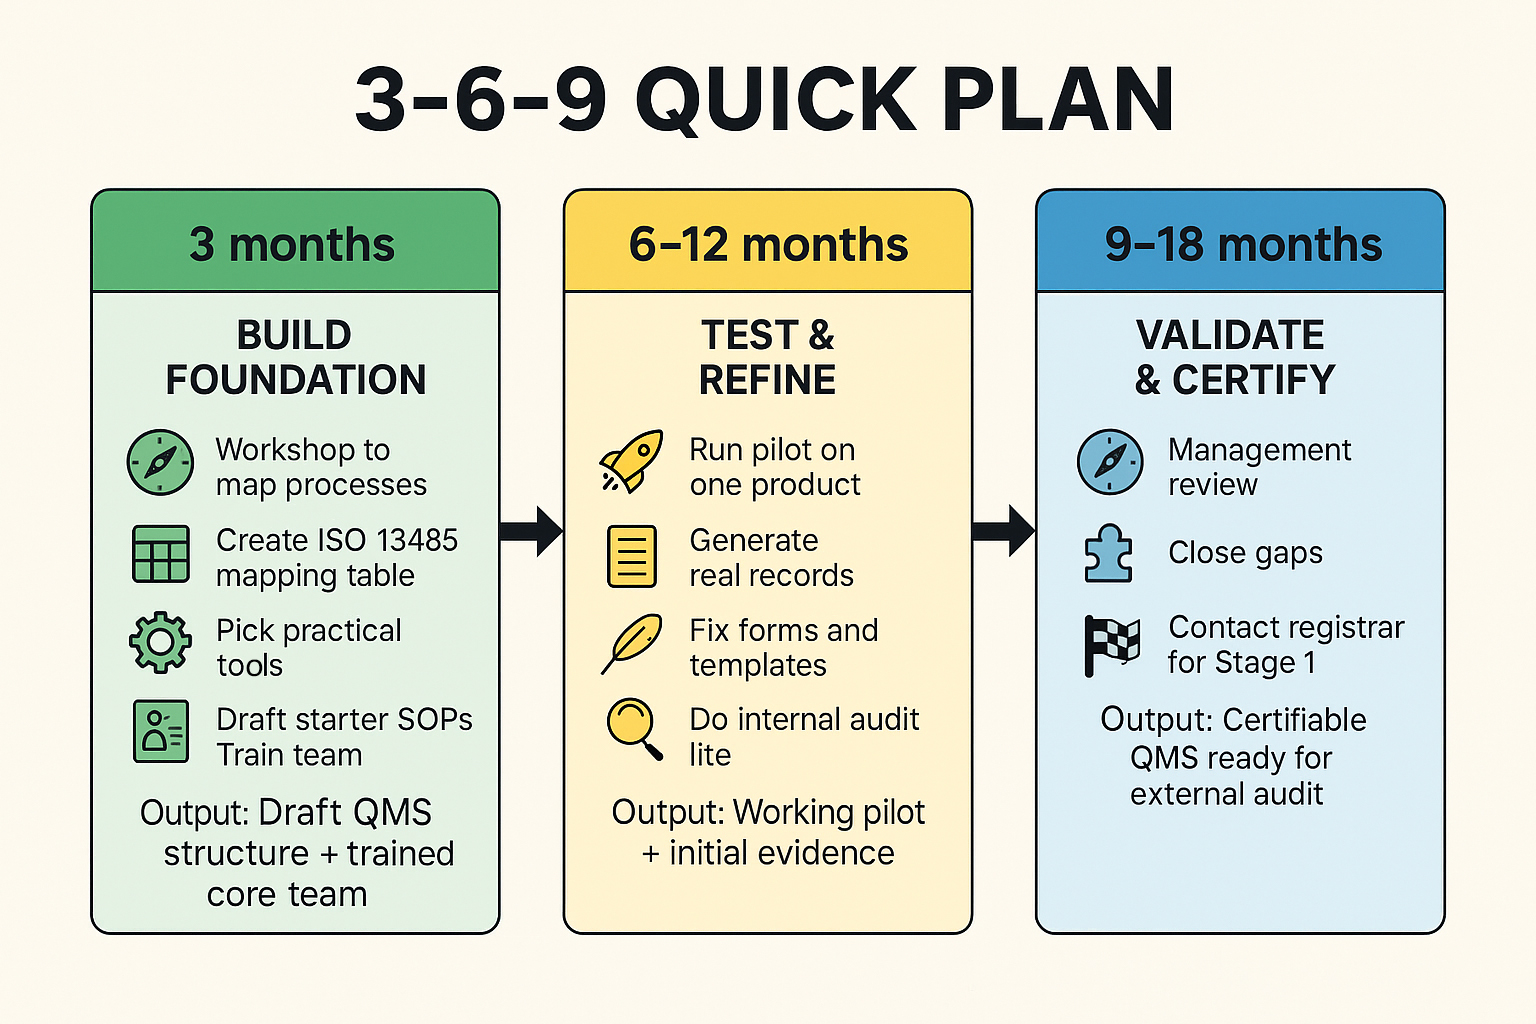
Now it’s time to test your system in real life. Take your pilot product or feature through the full process, from requirements and risk analysis to design, verification and validation, change control, and release. Capture real records using your new forms and refine them as you go. The aim is to see what works, what doesn’t, and to fix it while the stakes are still low.
Once the pilot is complete, run a short internal audit using your mapping table. Check whether the required evidence exists and whether people followed the process as written. Then hold a management review to discuss audit results, CAPA status, supplier issues, KPIs, and resources. Record all decisions and actions. These notes become proof that leadership is actively involved in quality.
Clean up any findings, finalise your SOPs and forms, and lock your document versions. When the system feels stable, contact a registrar or Notified Body to confirm timelines and expectations for your Stage 1 audit. This final step turns your internal system into a certifiable, recognised QMS, ready for market approval.
Meeting the requirements of ISO 13485 is one thing, putting them into practice is another. That’s why this article is part of a broader series developed for New Zealand’s HealthTech sector, aimed at helping teams turn regulatory expectations into working systems.
The QMS Series is brought to you by the HealthTech Activator, in partnership with Elevate Medtech.
This series explores ISO 13485 in four parts: from first steps and system setup to risk management and audit readiness. Participants who complete the quiz at the end of each section will receive an ISO 13485 QMS Certificate of Completion from the HealthTech Activator.

